Do You Know About Dockerfiles?
What is Docker?
Do you know the famous phrase It works on my machine?
Yeah, forget about it, with Docker it is not an excuse anymore. Docker allows you to locally run the same (or almost the same) environment which will be used in production.
So let’s get started understanding what docker is.
Let’s first look at the definition given by Wikipedia:
-
Docker is a set of platform-as-a-service (PaaS) products that use OS-level virtualization to deliver software in packages called containers.
-
Docker is a computer program that performs operating-system-level virtualization, also known as “containerization”.
-
All containers are run by a single operating-system kernel and are thus more lightweight than virtual machines. — Wikipedia
More than that, Docker is a popular tool to make it easier to build, deploy and run applications using containers. Containers allow us to package all the things that our application needs like such as libraries and other dependencies and ship it all as a single package. In this way, our application can be run on any machine and have the same behavior.
Dockerfile
Now, what I will show you in this piece are all the key instructions that you can find inside a Dockerfile. This will allow you to understand and create basic Docker files, without all that much theory.
If you want to try out the examples, you’ll have to install Docker. An overview of all the instructions I will discuss here:
- FROM
- RUN
- CMD
- COPY
- ADD
- WORKDIR
- ENTRYPOINT
- ENV
- LABEL
- HEALTHCHECK
- STOPSIGNAL
- VOLUME
- EXPOSE
FROM:
Almost every Dockerfile you’ll come across will start with the FROM instruction in the following form:
FROM <image>[:tag]
This instruction will set the base image for the Dockerfile, which means that every instruction that follows applies to this base image.
You can optionally specify a specific tag that Docker needs to use or pull during the execution of the docker build command, the default is the latest tag.
Let’s start with a practical example! Create a directory for this tutorial somewhere in your operating system. Add an empty Dockerfile (without extension) and add the following content:
FROM ubuntu
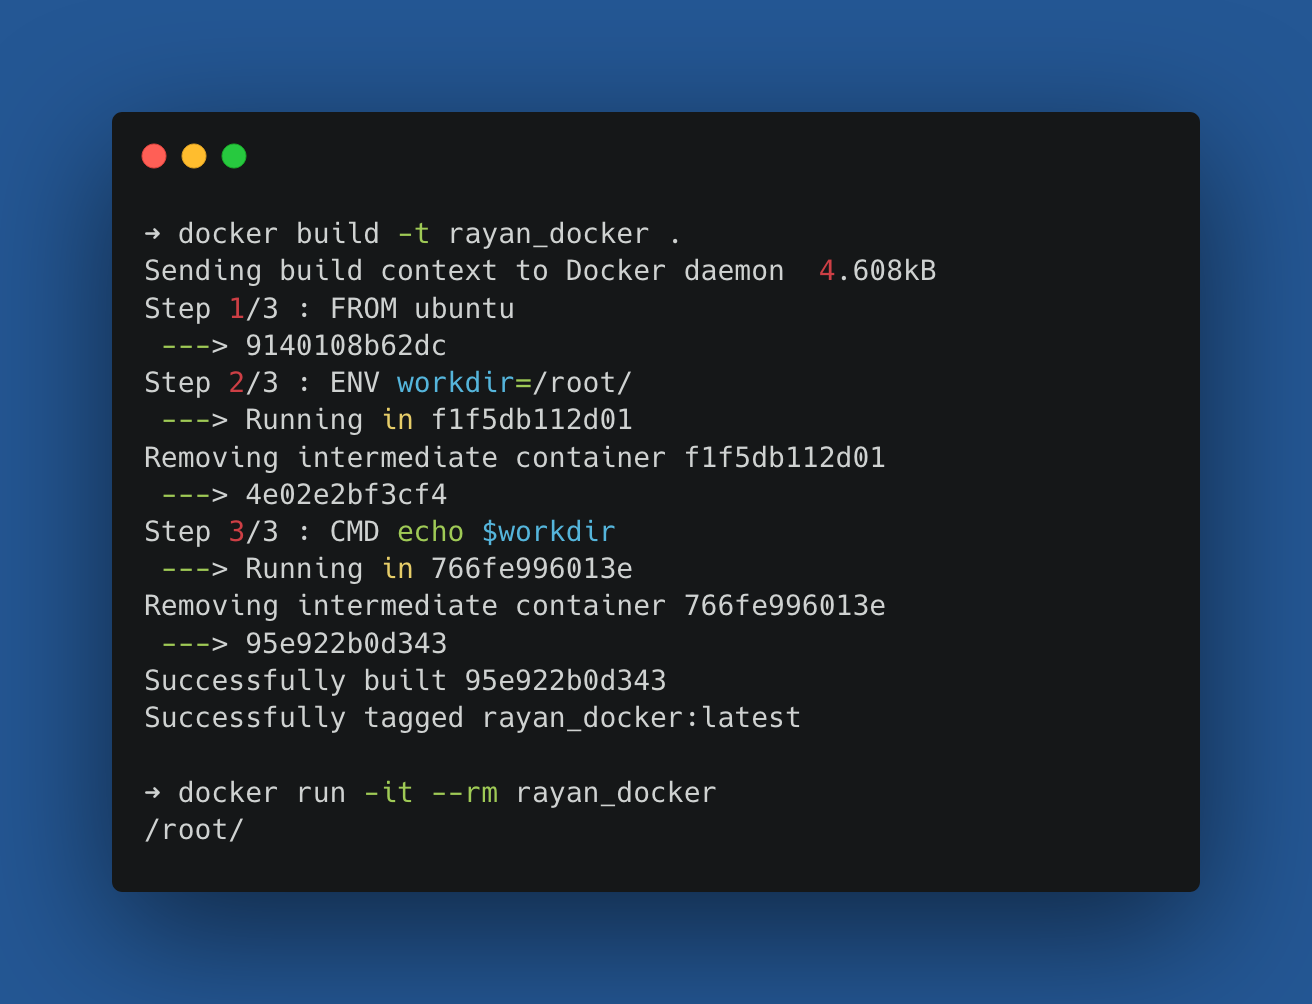
This will pull the latest base image from Ubuntu. Let’s build our first Dockerfile! For this, we’ll use the following docker build command:
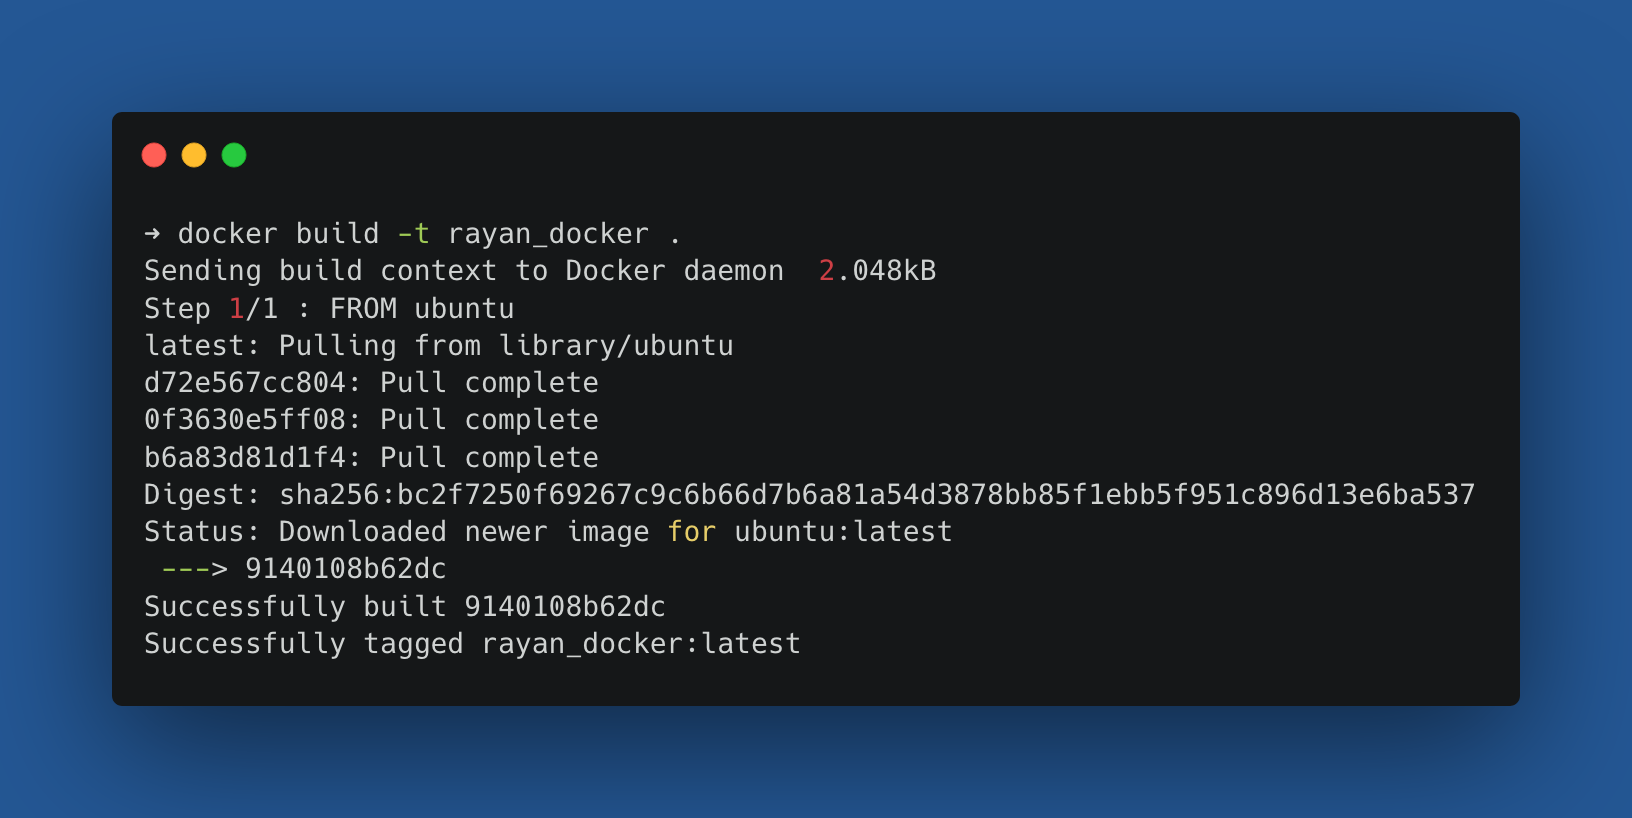
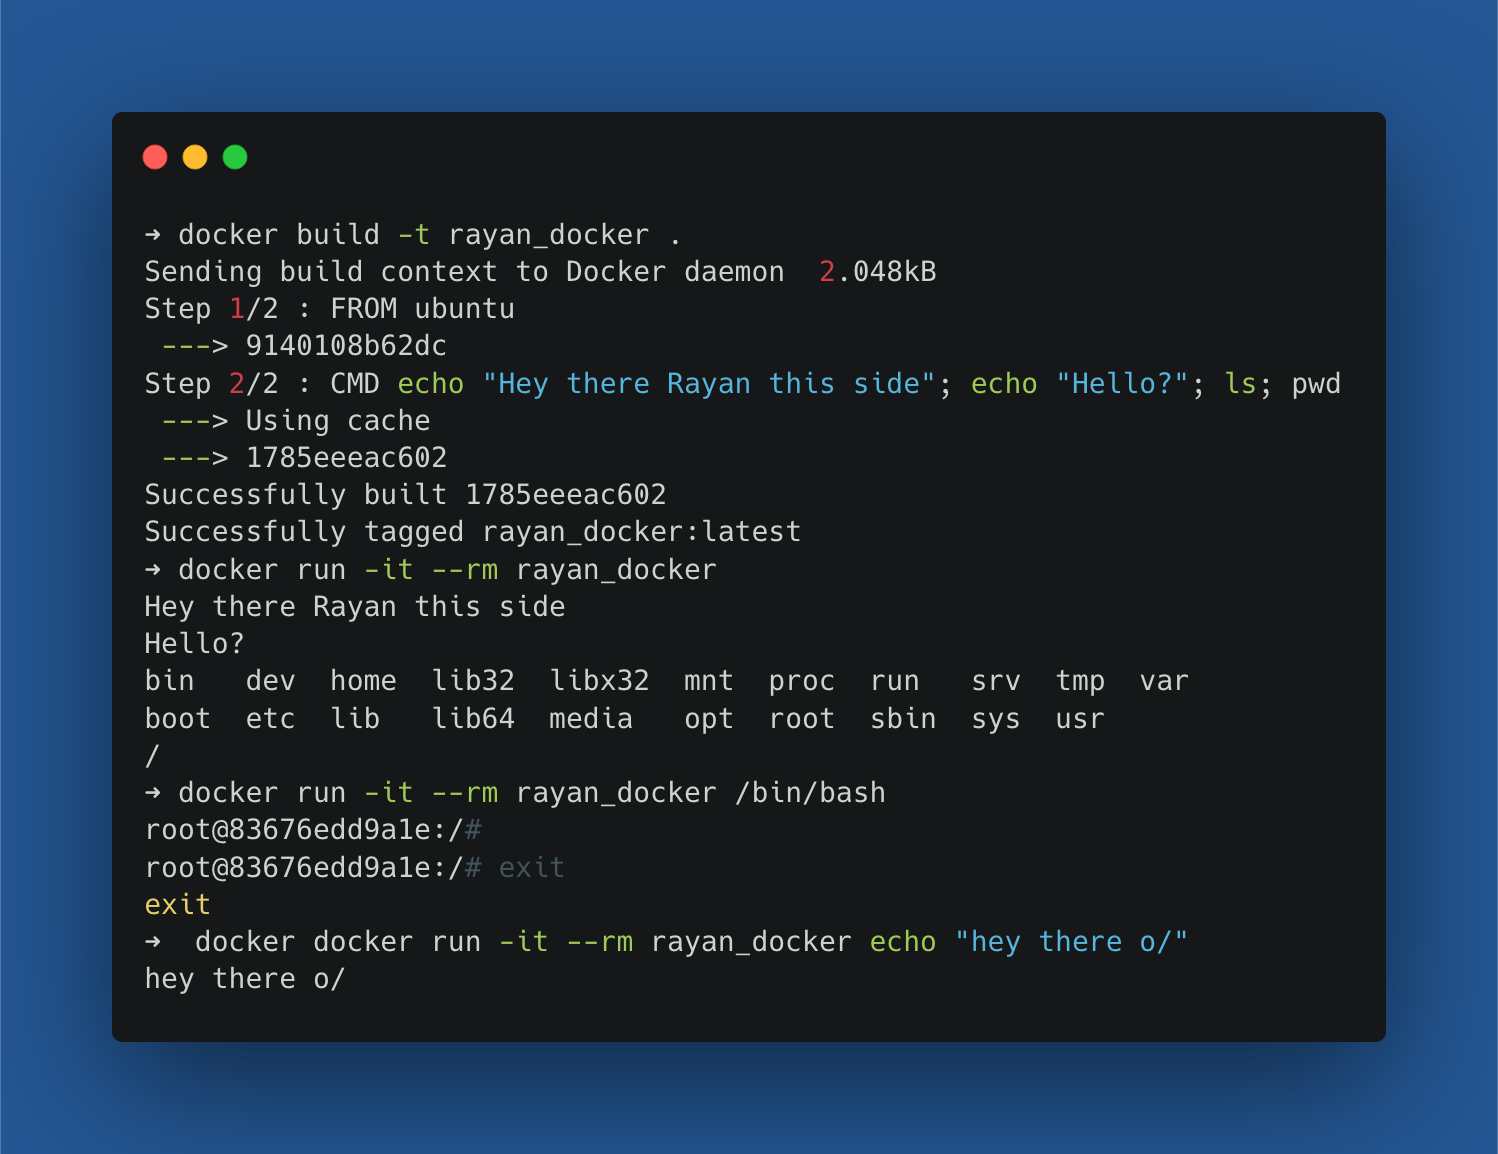
We now have created a Docker image with the name rayan_docker. The -t command-line option is a shorthand for -tag and gives a name to your Docker container.
We also specify ., which is just a shorthand for our current dir. Now we have our Docker container, let’s run it and see what happens:
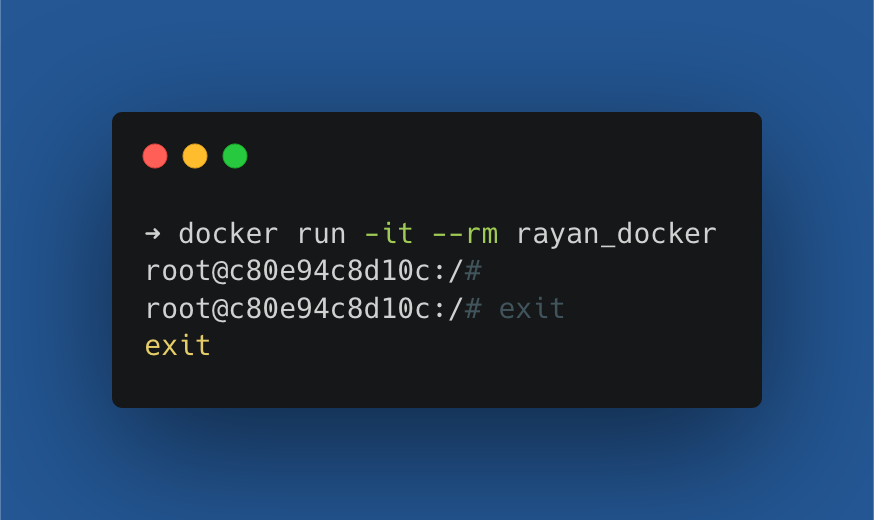
This command runs the Docker container and creates an interactive Bash shell in the container (-it). It also automatically removes the container when it exits (--rm).
To exit a Docker container, we can thus use the simple exit command. And that’s how you build and run your first Docker container. Our command has just one build stage now. Not so complicated so far right?
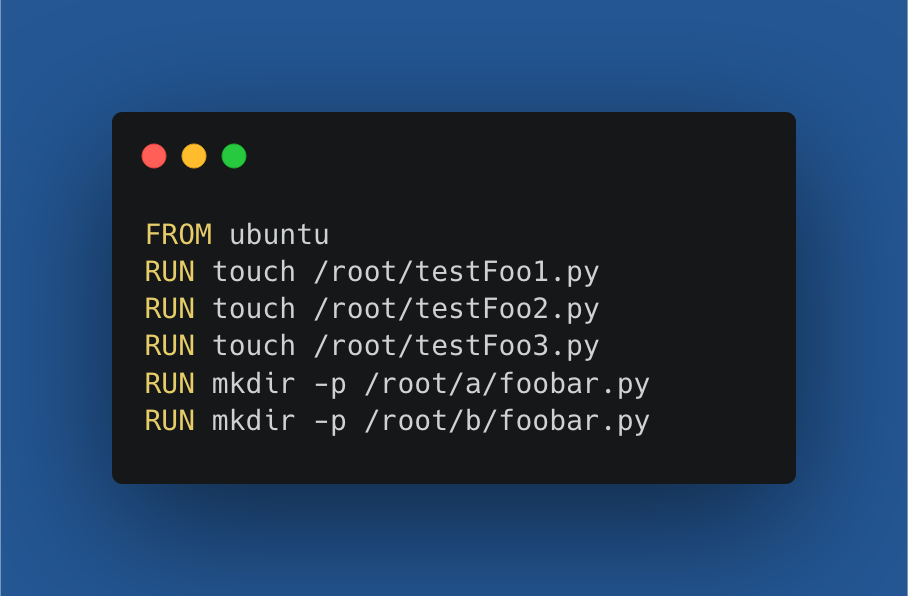
RUN:
This instruction does what it says, it runs commands. Or more specifically, it executes a specific command. It is possible to perform multiple commands using multiple lines with RUN, but I’d advise combining as many commands in one line.
Read more about Dockerfile best practices
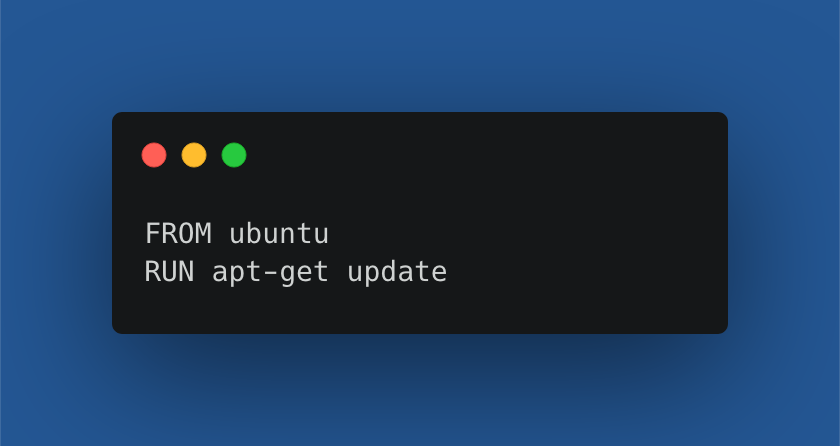
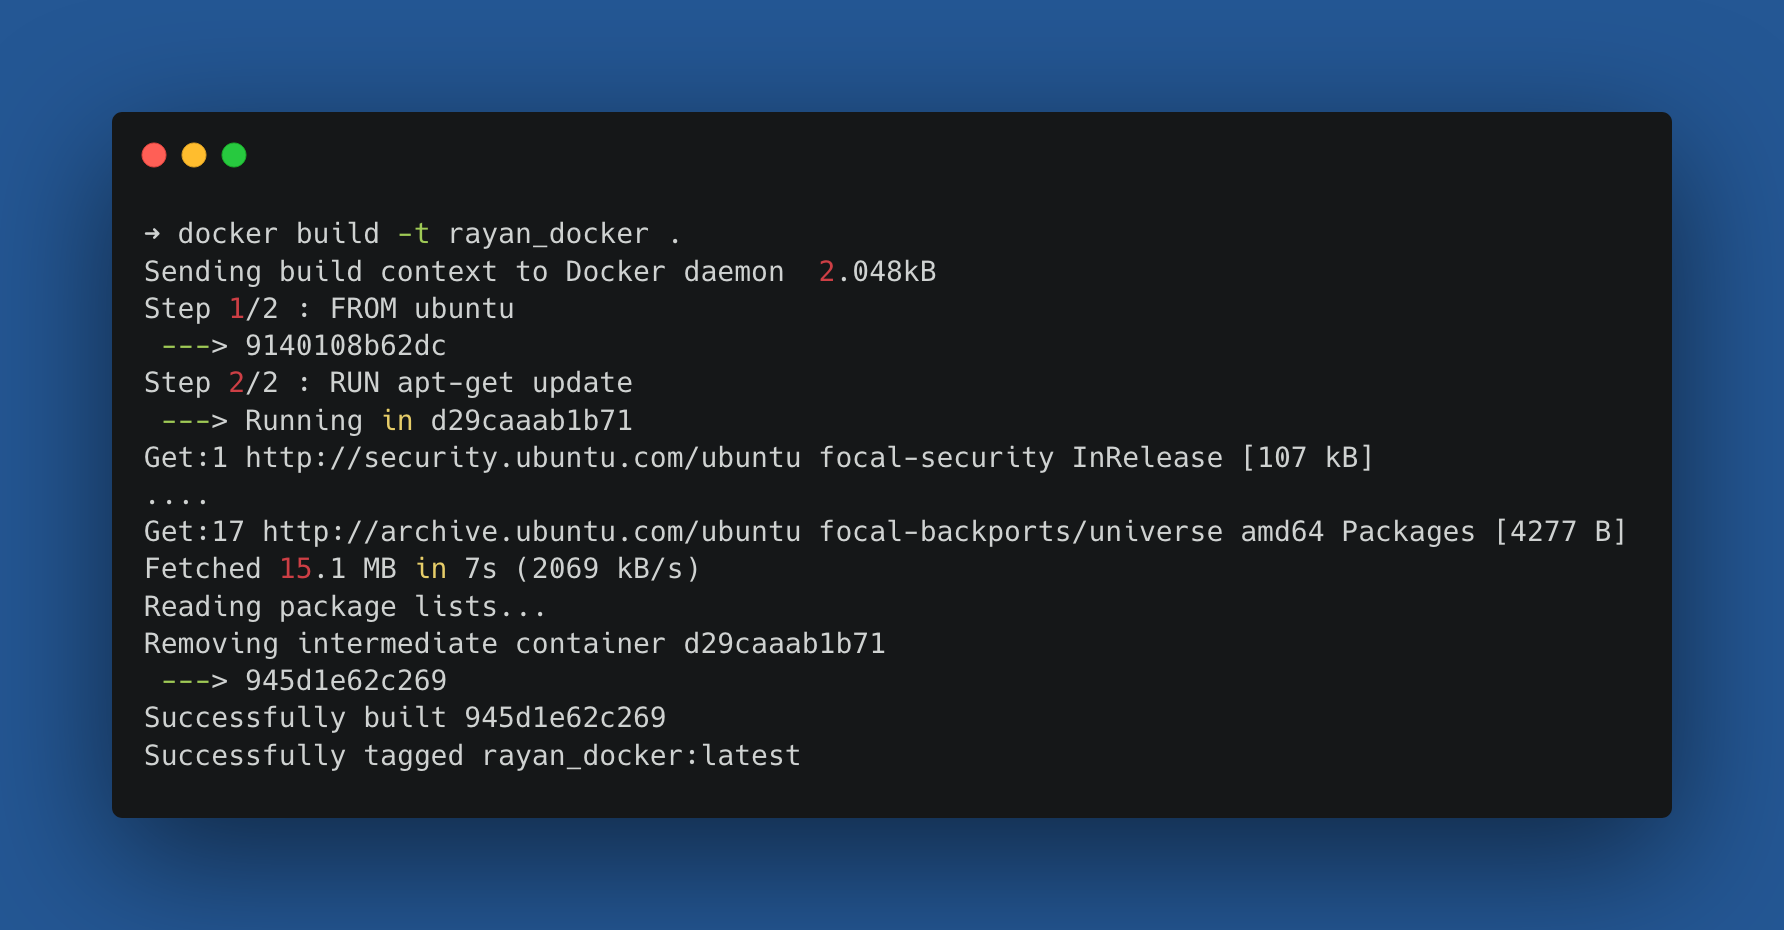
Now, let’s give an example, put the following lines in your Dockerfile. The apt-get update command downloads the package lists from the repositories and updates them to get information on the newest versions of packages and their dependencies.
Now let’s run the build command as we did earlier:
Then, afterward, we run the Docker container as we did earlier as well:
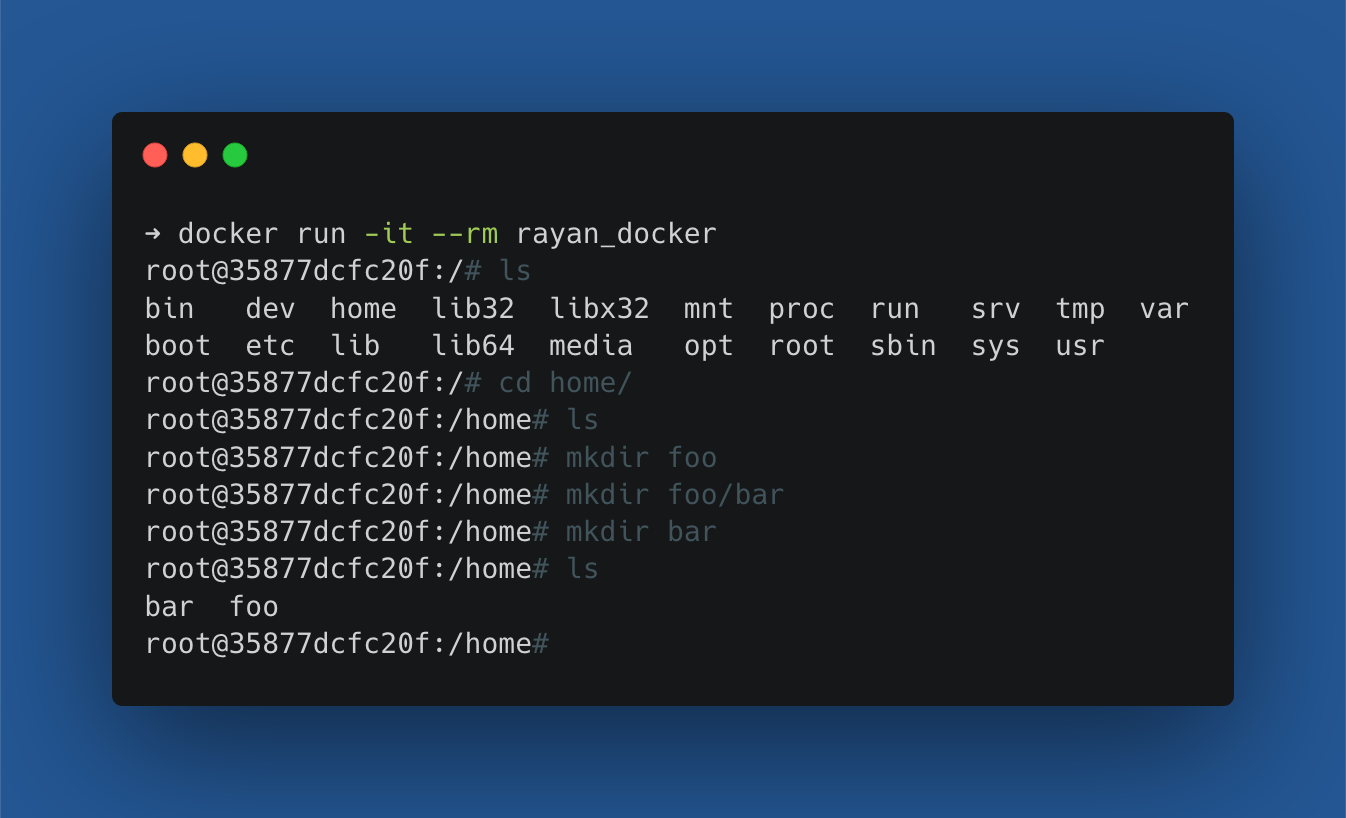
We go to the home dir and make a directory foo, inside it another directory bar and inside home another dir bar.
Afterward, we exit the Docker container and it’s all gone again.
CMD:
The CMD instruction sets a default command, which will be executed when you run the Docker image without specifying a command. This allows you to do the following, for example:

Build and run the Docker again. You might have noticed that it is possible to run different commands after each other as well.
It’s also possible to provide a different command to the Docker image, which will be executed instead of the one specified in the instructions in the Dockerfile. I give two examples of this:
- The first command starts the Bash interpreter by specifying
/bin/bash. - The second command tells you “hey there o/”.
COPY:
The COPY instruction copies a dir from your local machine to your Docker image. When the Docker image is up and running, you’ll see the dir in the image as well. Let’s see how we can do this exactly with an example:
First, we need to create a Dockerfile:
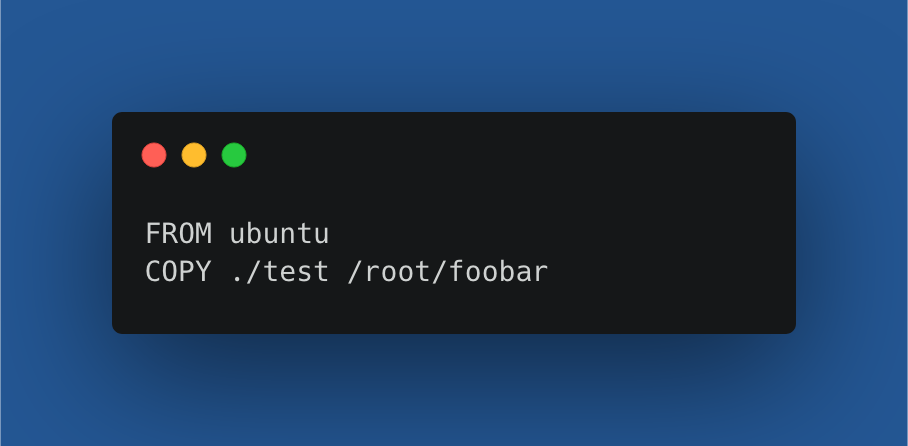
I’ll explain the COPY instruction. Here we say that we will copy the contents of the test directory (with a file foo.py inside) into the foobar directory inside the root dir of the Docker container.
This command would also copy subdir automatically if we specified some. To prevent some dir or files from being copied, you can specify them in a dockerignore file. I’ll create a rayan_docker container to show you exactly what this would look like:

ADD:
COPY and ADD serve similar purposes. They both let you copy files from a specific location into a Docker image. The ADD instruction lets you do the same as the COPY instruction, but on top, it supports two other sources:
- You can extract a TAR file from the source directly.
- You can use a URL instead of a local file directory.
- Extracting a TAR file:

Let’s run the build and run commands to inspect what happens:

The ADD instruction allows you to specify where you want it, so you can just say copy it inside the root dir. It’s slightly different from the regular ADD or COMMAND instructions as you don’t specify the resulting dir name.
- Using a URL:
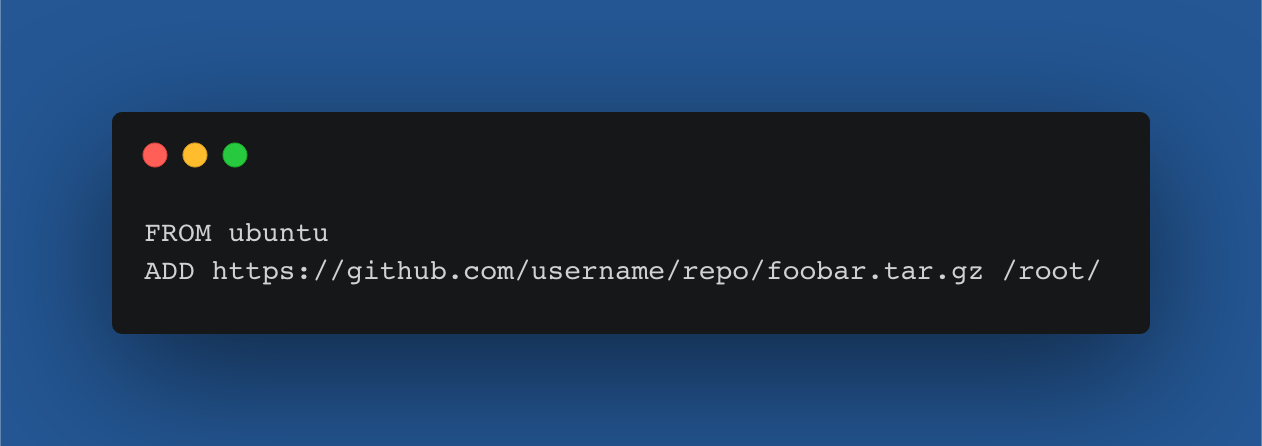
According to the docs, when <src> is a URL and <dest> does end with a trailing slash, then the filename is inferred from the URL and the file is downloaded to <dest>/<filename>.
Keep this in mind when you are using the ADD instruction. I’d recommend using curl to download if you want to download more than just one file.
WORKDIR:
The WORKDIR instruction is used to define the working directory of a Docker container at any given time. The command is specified in the Dockerfile.
Any consecutive RUN, CMD, ADD, COPY, or ENTRYPOINT instruction will be executed in the specified working directory. I will first give you an example of what working without the WORKDIR instruction could look like:
The problem with this Dockerfile is the amount of repetition. In every instruction, we explicitly specify the root dir. In the last two commands, we even need to specify a subdir inside the root dir.
This is only a small example, but it would be nice to specify the current working dir just once. The WORKDIR instruction does just that for us.
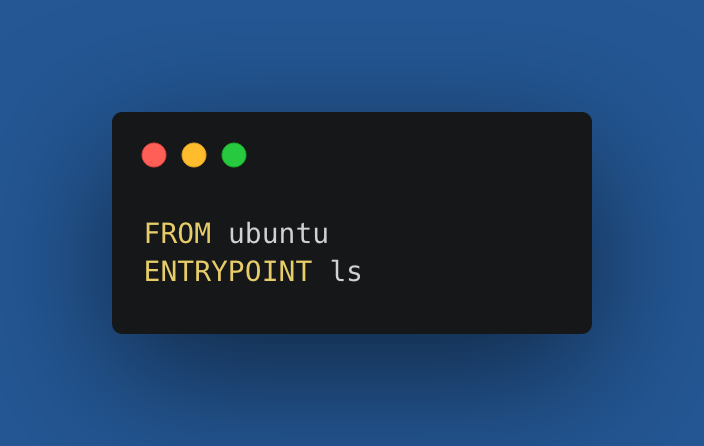
ENTRYPOINT:
The ENTRYPOINT instruction of a Dockerfile looks similar to the CMD instruction at first sight. It specifies the default command to execute at runtime, and you’ll not be able to override it.
So, my advice would be if you want to specify a command that will run once the container starts and you don’t want the user to override it, use ENTRYPOINT.
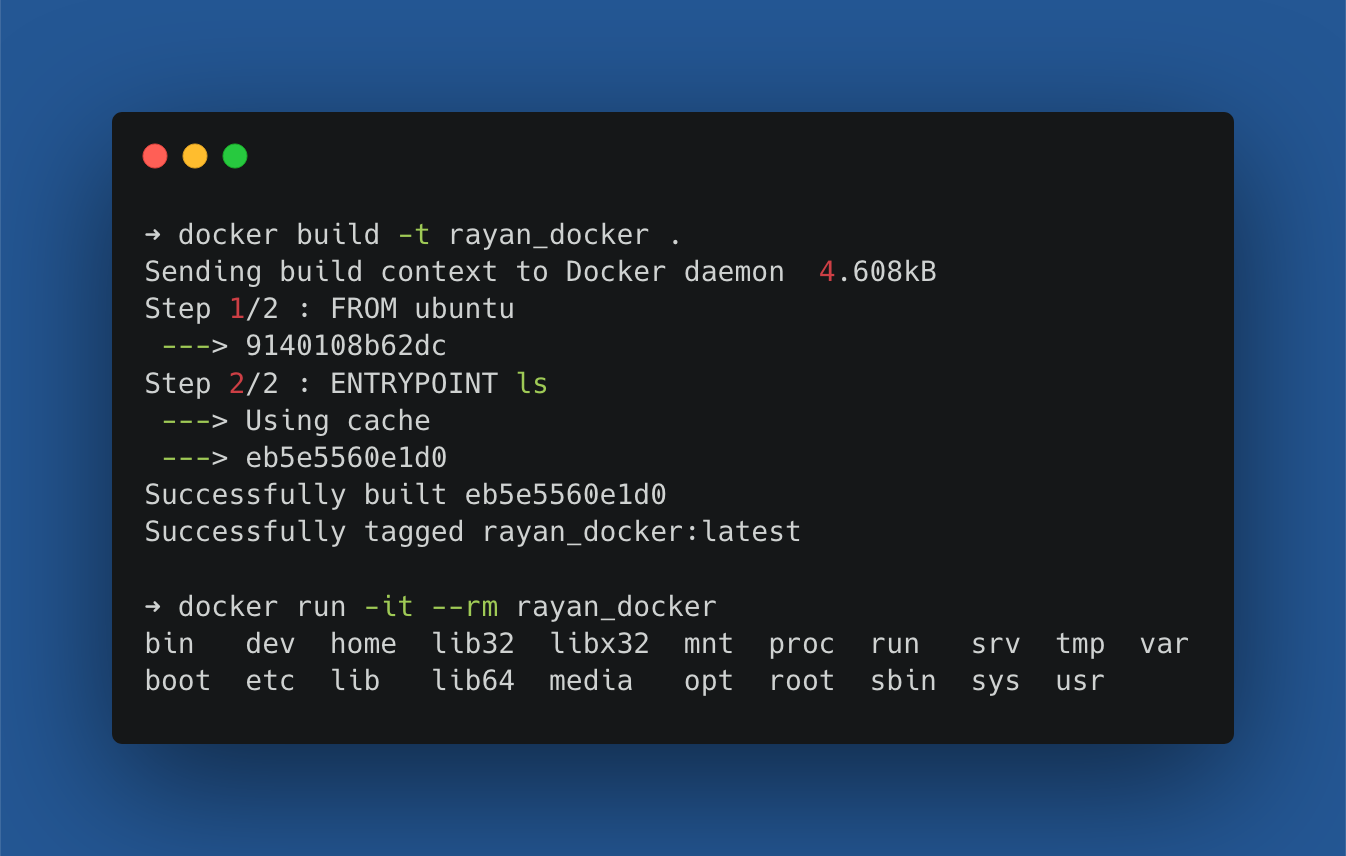
The Dockerfile above results in the following build and run.
ENV:
The ENV instruction allows you to set environment variables for your Docker container.
An environment variable is a dynamic-named value that can affect the way running processes will behave on a computer. They are part of the environment in which a process runs. — Wikipedia
Most developers are familiar with environment variables so I’m not going into too much detail here. I’ll just give an example Dockerfile and I’ll discuss what happens.
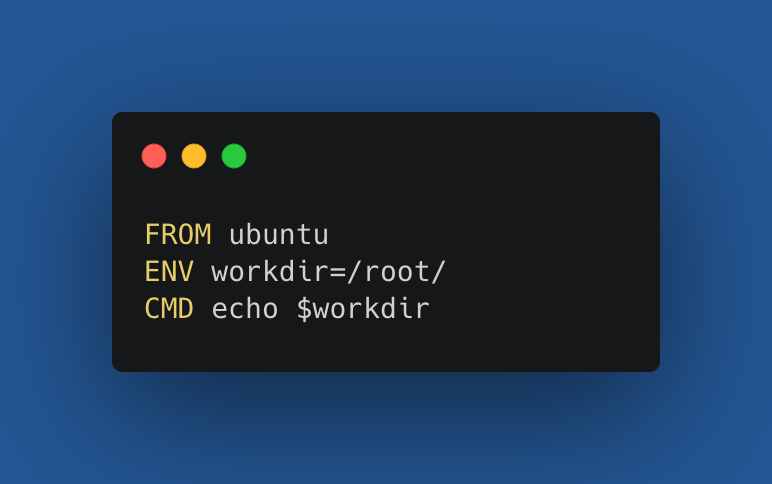
So, what I do here is I create an environment variable workdir using the ENV instruction. This allows me to use it at any later point in time when the container is running.
In this example, Its showing the environment variable using the dollar sign prefix. When building and running the container, you see that the root dir is printed to the console. It’s a very useful instruction.
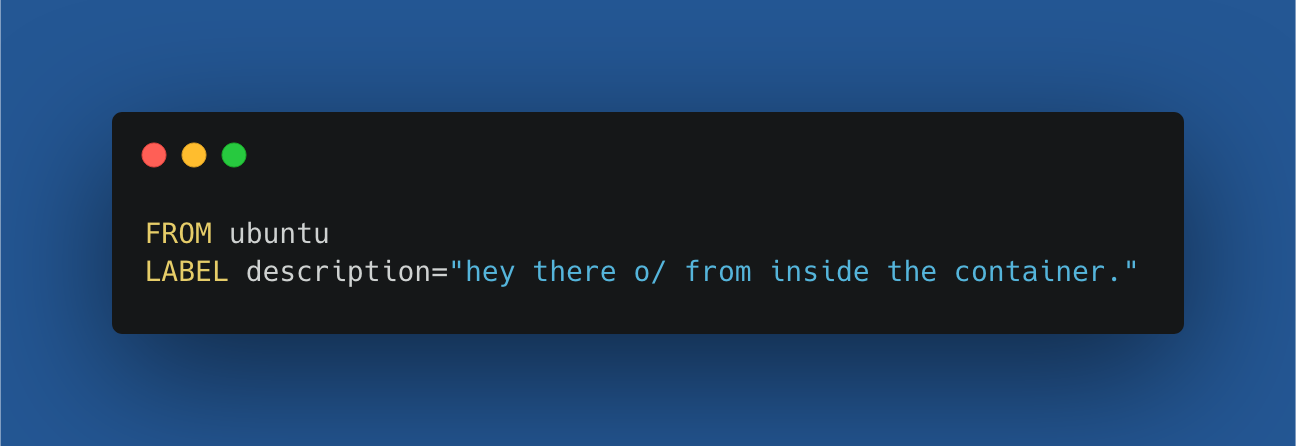
LABEL:
The LABEL instruction allows you to add metadata to an image. It’s always a key-value pair, and it’s recommended to put your label value in between quotes.
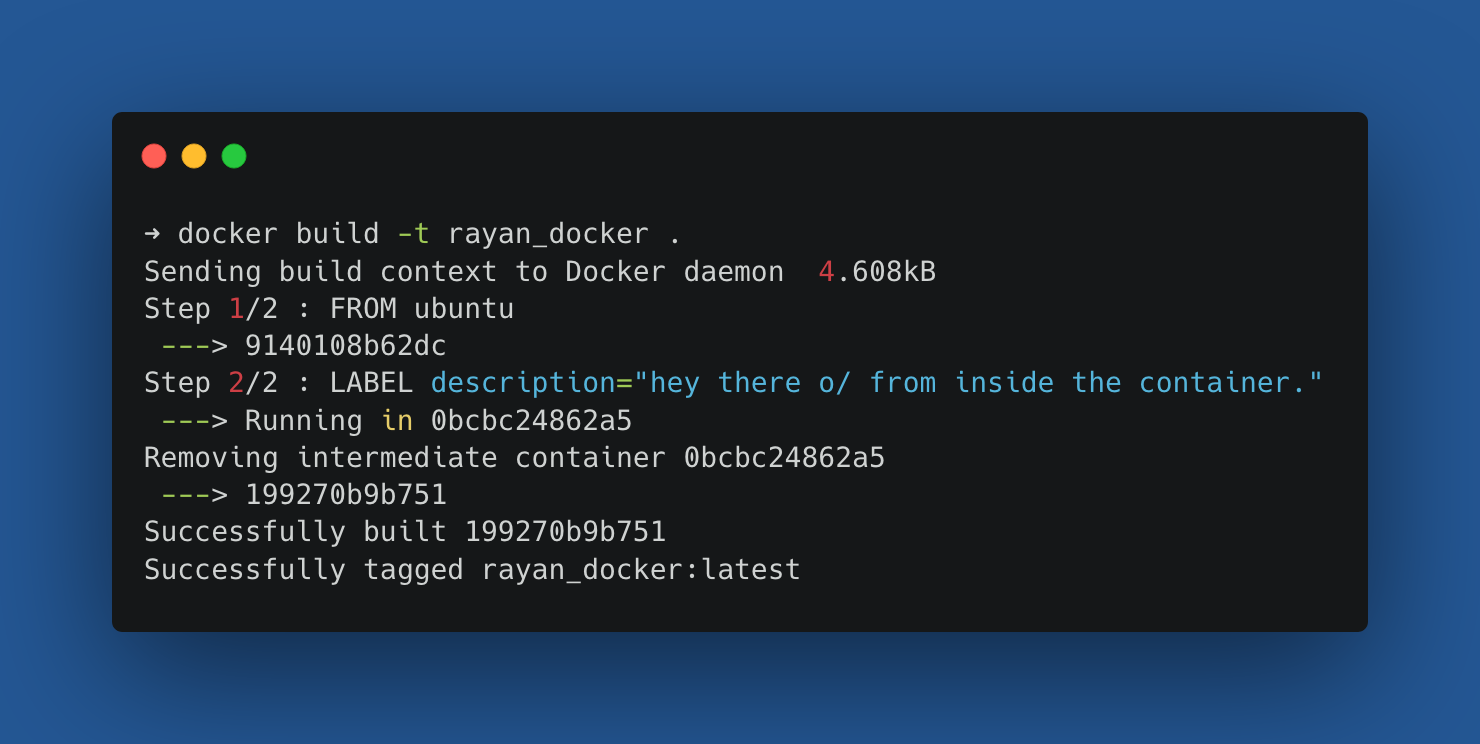
I’ll give a simple example of a Dockerfile using the LABEL instruction:
This docker image becomes active when you run the usual build command.
You can also specify a LABEL instruction when running a container using the command line. When there are a lot of running containers, the LABEL instruction allows you to search for specific keys.
HEALTHCHECK:
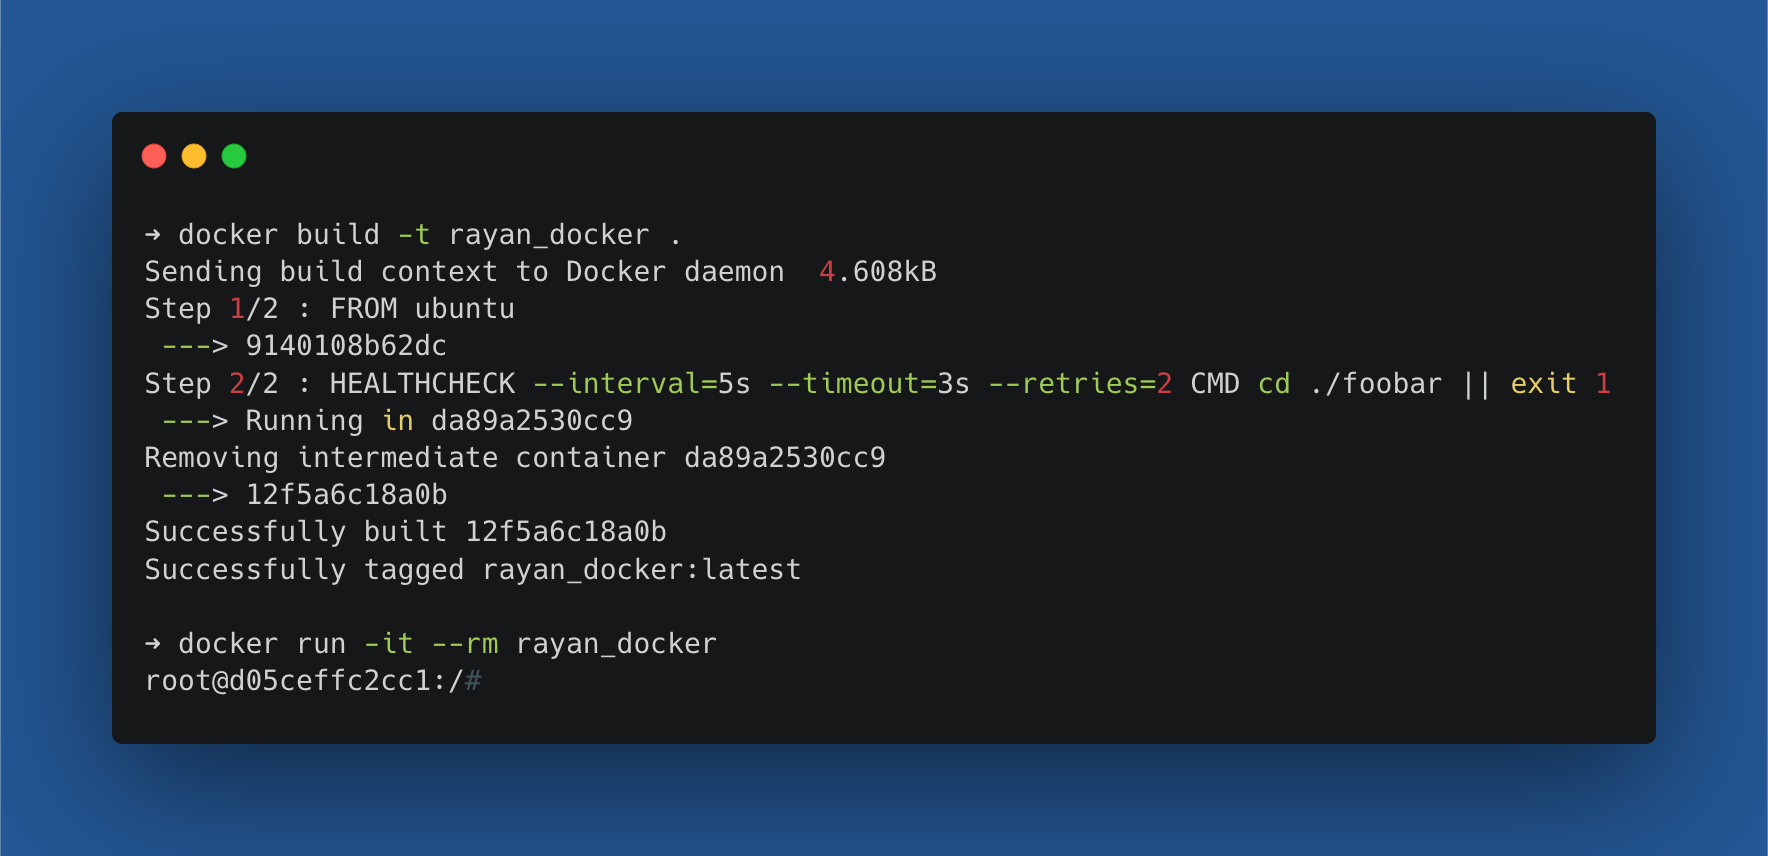
The HEALTHCHECK instruction tells Docker how to test a container to check that it is still working. This can detect cases such as a web server that is stuck in an infinite loop and unable to handle new connections, even though the server process is still running. To explain the HEALTHCHECK instruction, I’ll first create a Dockerfile:
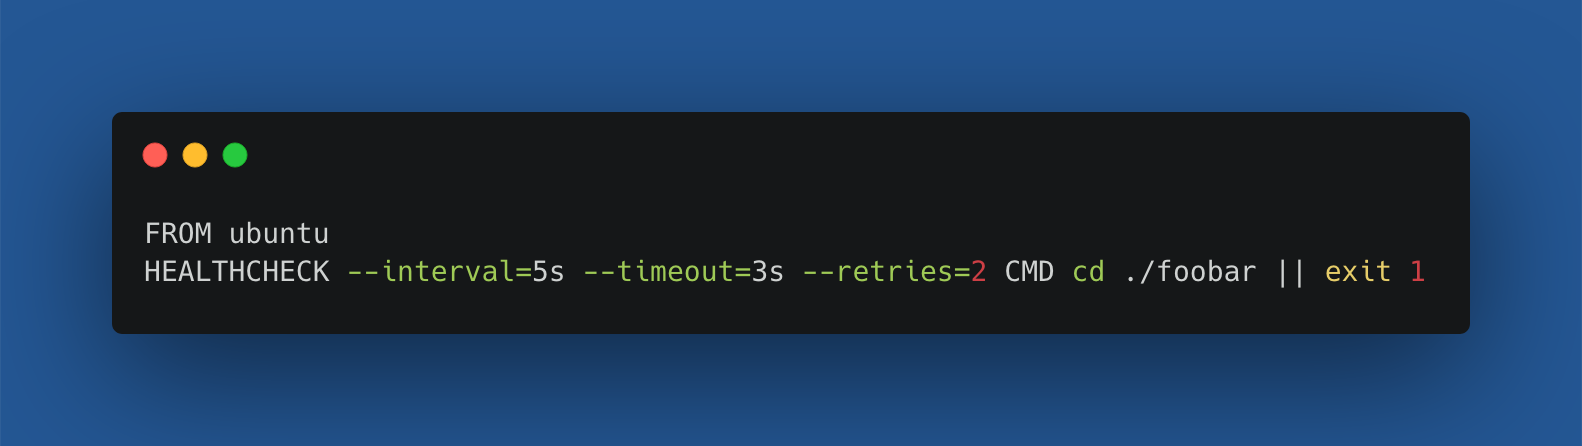
Let me explain the different parameters:
interval(default is 30 seconds): The health check will first run for five seconds after the container is started, and then again five seconds after each previous check completes.timeout(default is 30 seconds): If a single run of the check takes longer than three seconds then the check is considered to have failed.retries(default is three times): It takes two consecutive failures of the health check for the container to be considered unhealthy.- The command: Check if the foobar directory exists, otherwise exit with an error.
Lets build and run the Docker container:
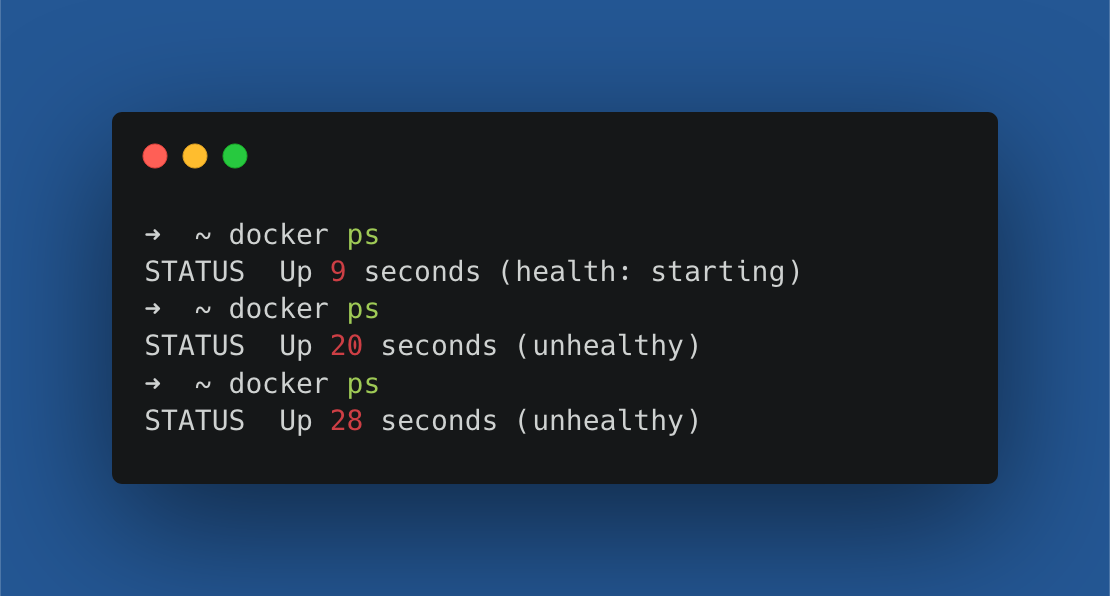
When we open a different terminal, we can inspect the running Docker containers. In the first ten seconds, the container can’t realize if it’s unhealthy or healthy.
After one retry, that becomes possible and we see after 20 seconds that the HEALTHCHECK concludes that it’s not unhealthy. This is indeed the case, as the dir foobar never exists in the base image of Ubuntu.
When I run mkdir foobar inside my Docker container, the status will become healthy. I now run the Docker ps command again after waiting for an instant until the first health check is successful.
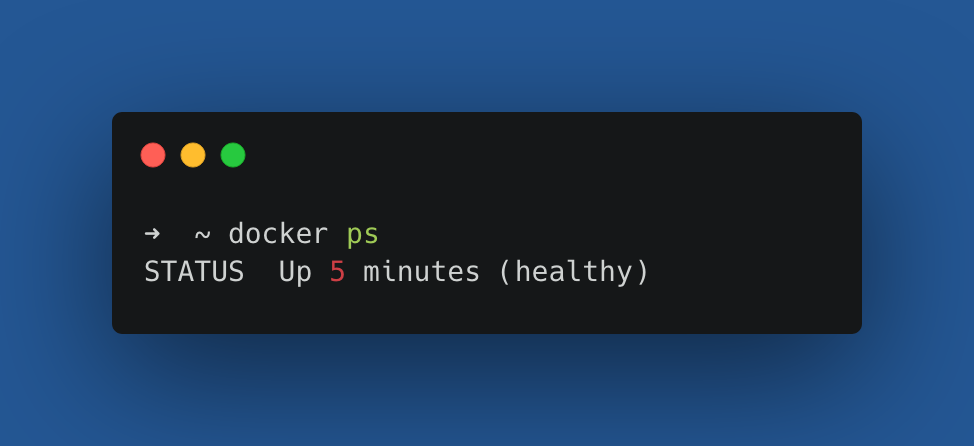
You’ll notice that this command is extremely useful when you have dependencies between Docker containers (e.g. waiting until the database is up, before executing database queries).
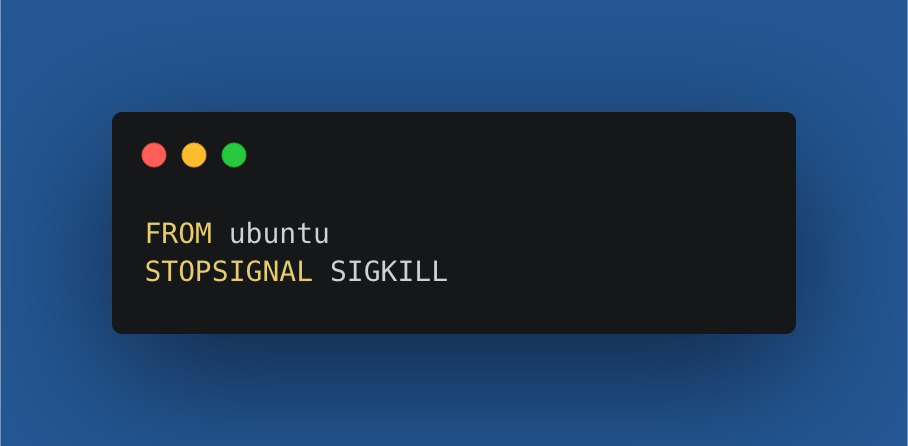
STOPSIGNAL:
If you’ve ever tried to kill a Docker container with the docker stop command, you might have noticed that Docker will first ask nicely for the process to stop and if it doesn’t comply within 10 seconds it will forcibly kill it. This is because the default STOPSIGNAL of a Docker container is a SIGTERM signal.
You can change this by specifying the STOPSIGNAL instruction to become a SIGKILL. When you’d run docker stop on your container, the Docker container will now shut down immediately.
The process is immediately terminated. To check this out yourself, use the following Dockerfile.
Let’s build and start the container:
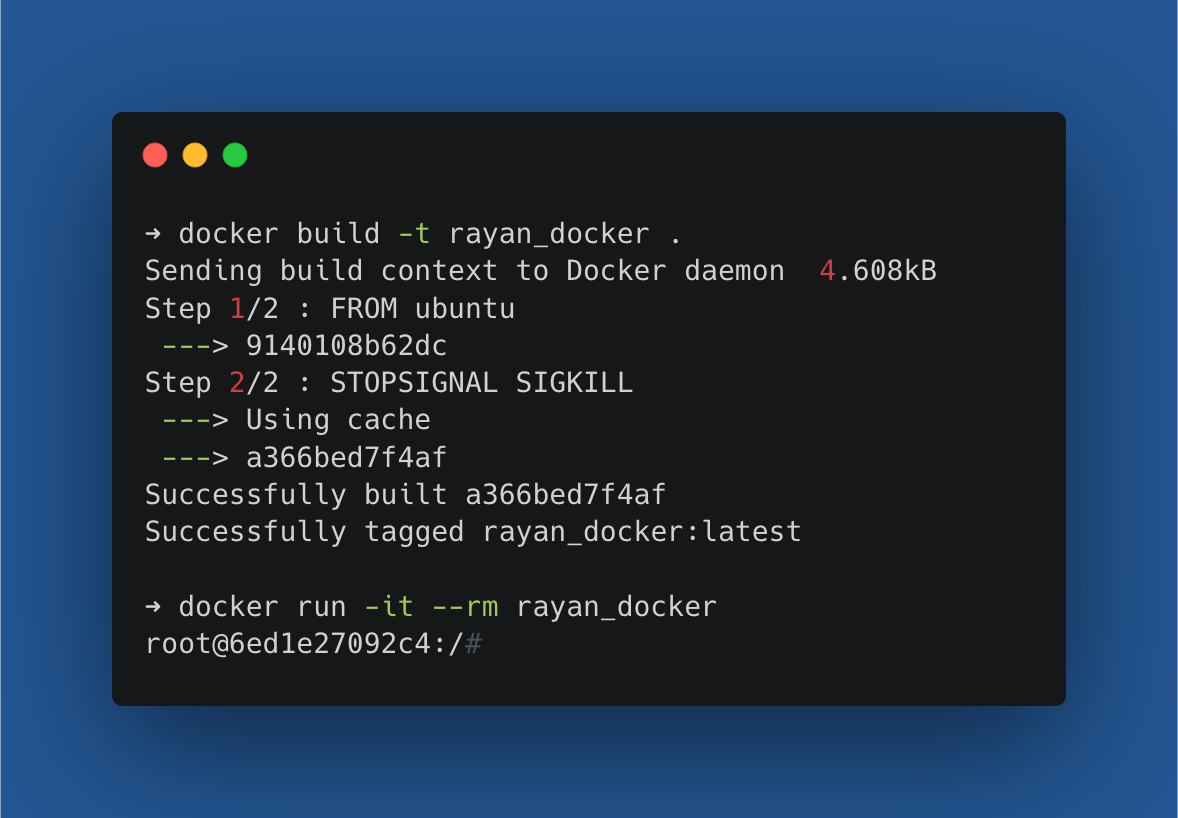
Now open a new terminal and execute the following steps:
docker ps
There is one running container with an identifier 6ed1e27092c4.
docker stop 6ed1e27092c4
Now no containers are running anymore, as the target Docker container exits immediately.
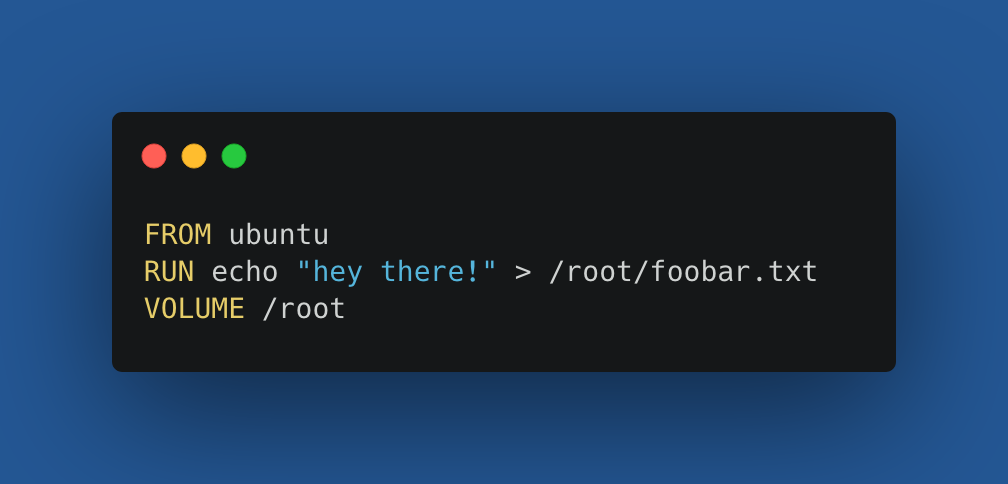
VOLUME:
Let’s create a Dockerfile with the root dir specified as a volume. In our initial image, there will be a foobar.txt inside the root dir.
Now build the container:
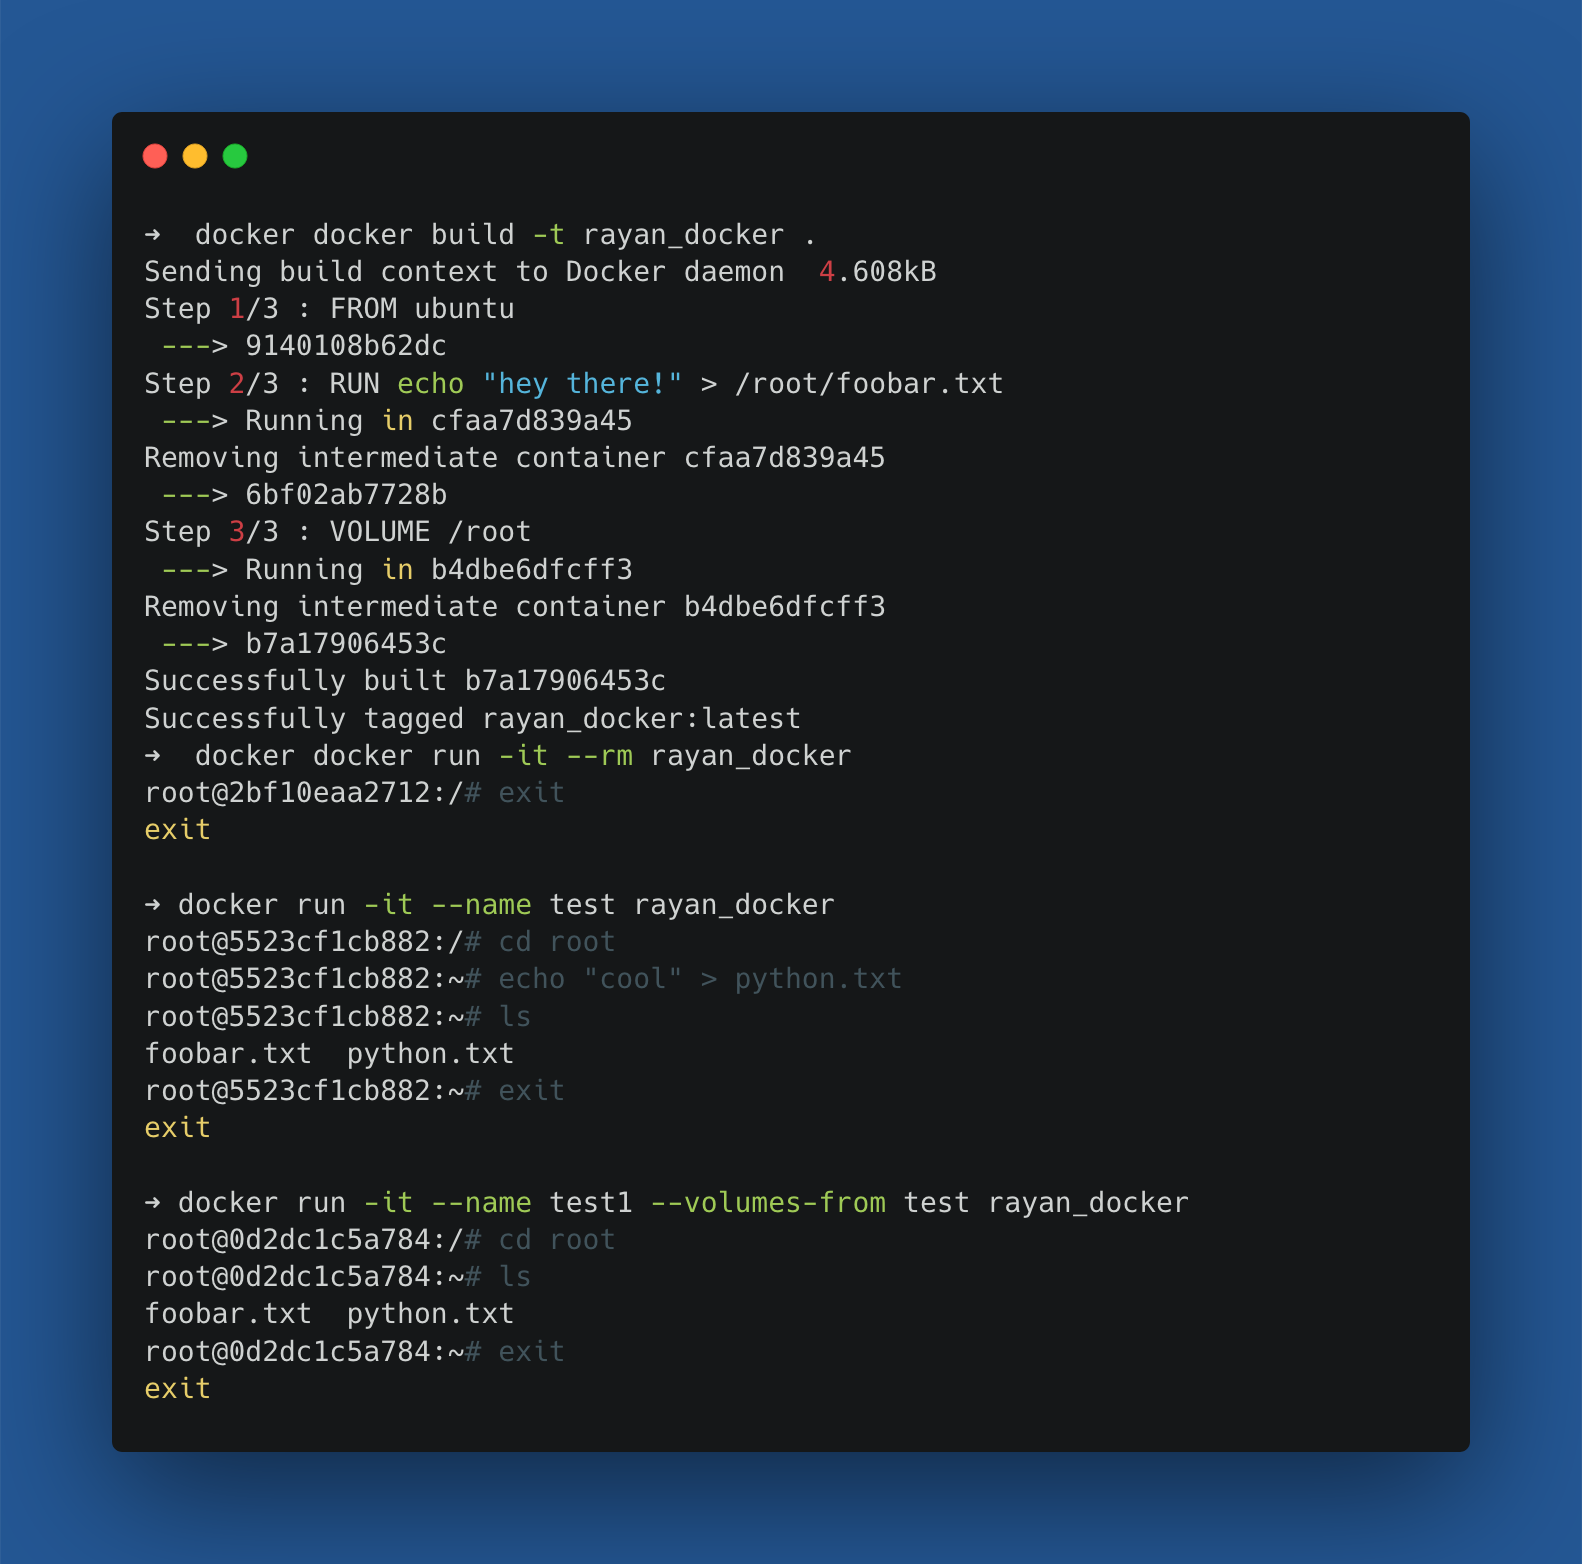
The --volumes-from parameter allows us to use the volume of a different container, therefore allowing us to persist data between containers.
EXPOSE:
The EXPOSE instruction informs Docker that the container listens on a specific network port at runtime. You can also specify whether the port listens on TCP or UDP (the default is TCP).
Exposing ports is a way of documenting which ports are used, but does not map or open any ports. Exposing ports is optional. By default, when you create a container, it does not publish any of its ports to the outside world.
To make a port available to services outside of Docker, or to Docker containers that are not connected to the container’s network, use the --publish or -p flag. This maps a container port to a port on the Docker host.